
Once you have a working live preview, the next step is showing camera state in a readable way—especially when screen space is limited (embedded displays, lab setups, compact inspection tools).
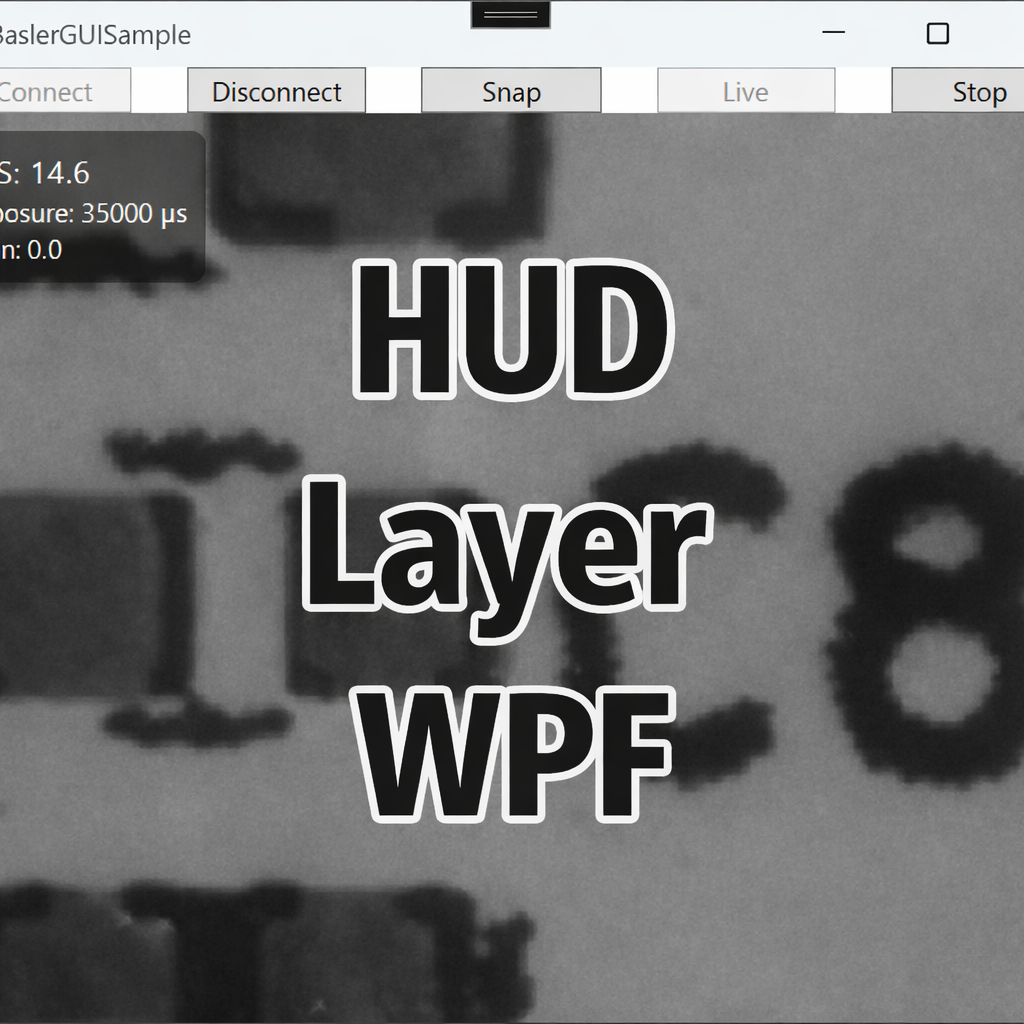
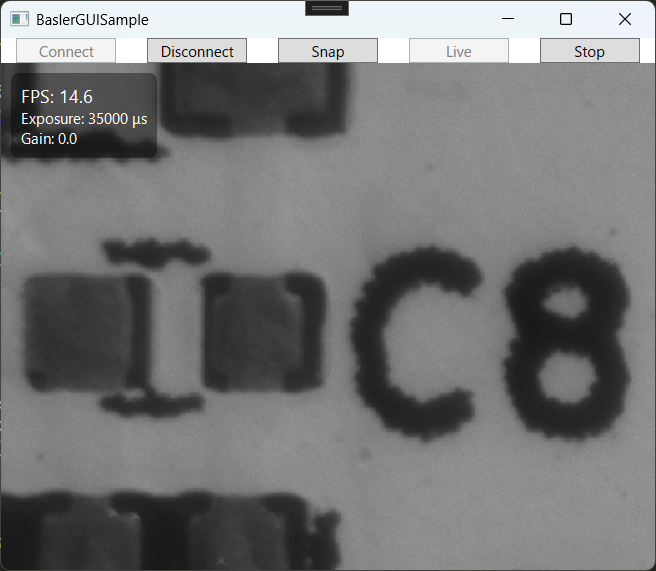
In this article, we overlay a HUD (FPS, exposure, gain, crosshair, etc.) on top of a Basler live view in WPF. Instead of drawing text directly onto the image (which can blur or jitter during zoom/pan), we use a layer-separated approach: an image layer for the video and a transparent HUD layer that stays fixed in screen coordinates.
This structure is also a solid foundation for future features such as:
- ROI (Region of Interest) editing in the GUI
- Capturing and saving “image + HUD” using
RenderTargetBitmap
Environment / Assumptions
- Basler pylon Camera Software Suite (
Basler.Pylonreferenced) - .NET 8 / WPF (Windows desktop)
- Camera: acA2500-14gm (assume Mono8)
Goal
Building on the previous live-view article, we add:
- A two-layer layout: Video layer (Image) + HUD layer (transparent Grid)
- The HUD is fixed to screen coordinates (does not follow zoom), so text does not blur/jitter
- FPS calculated continuously but UI-updated at ~10 Hz, plus exposure/gain display
- A design that can later evolve into HUD-included capture via
RenderTargetBitmap
XAML: Dual Layer (with Optional ROI Layer)
Inside the display Grid, we stack multiple layers:
- Video layer (can be zoomed/panned in future)
- ROI layer (optional, follows the image)
- HUD layer (screen-fixed overlay)
|
1 2 3 4 5 6 7 8 9 10 11 12 13 14 15 16 17 18 19 20 21 22 23 24 25 26 27 28 29 30 31 32 33 34 35 36 37 38 39 40 41 42 43 44 45 46 47 48 49 50 51 52 53 54 55 56 57 |
<Window x:Class=“BaslerGUISample.MainWindow” xmlns=“http://schemas.microsoft.com/winfx/2006/xaml/presentation” xmlns:x=“http://schemas.microsoft.com/winfx/2006/xaml” xmlns:d=“http://schemas.microsoft.com/expression/blend/2008” xmlns:mc=“http://schemas.openxmlformats.org/markup-compatibility/2006” xmlns:local=“clr-namespace:BaslerGUISample” mc:Ignorable=“d” Title=“BaslerGUISample” Height=“450” Width=“500” Closing=“Window_Closing”> <Grid> <Grid.RowDefinitions> <RowDefinition Height=“Auto”/> <RowDefinition Height=“*”/> </Grid.RowDefinitions> <Grid.ColumnDefinitions> <ColumnDefinition Width=“*”/> <ColumnDefinition Width=“*”/> <ColumnDefinition Width=“*”/> <ColumnDefinition Width=“*”/> <ColumnDefinition Width=“*”/> </Grid.ColumnDefinitions> <!— Buttons omitted —> <Grid Grid.Row=“1” Grid.Column=“0” Grid.ColumnSpan=“5” UseLayoutRounding=“True” SnapsToDevicePixels=“True” TextOptions.TextFormattingMode=“Display” TextOptions.TextRenderingMode=“ClearType”> <!— Video layer (zoom/pan applied here in future) —> <Canvas x:Name=“ImageLayer”> <Image x:Name=“CameraImage” Source=“{Binding CurrentFrame}” RenderOptions.BitmapScalingMode=“NearestNeighbor” Stretch=“Uniform”/> </Canvas> <!— ROI layer (optional; follows the image) —> <Canvas x:Name=“RoiLayer” IsHitTestVisible=“False”> </Canvas> <!— HUD layer (screen–fixed; does not follow zoom) —> <Grid x:Name=“HudLayer” IsHitTestVisible=“False”> <Border Background=“#66000000” CornerRadius=“6” Padding=“8” Margin=“8” HorizontalAlignment=“Left” VerticalAlignment=“Top”> <StackPanel> <TextBlock Text=“{Binding FpsText}” Foreground=“White” FontSize=“14”/> <TextBlock Text=“{Binding ExposureText}” Foreground=“White” FontSize=“12”/> <TextBlock Text=“{Binding GainText}” Foreground=“White” FontSize=“12”/> </StackPanel> </Border> <!— Add more HUD elements here —> </Grid> </Grid> </Grid> </Window> |
NearestNeighboris good when you want pixel-accurate rendering.- Set
IsHitTestVisible="False"so the HUD doesn’t steal mouse input (important for future zoom/pan).
ViewModel: Throttled FPS Updates + Exposure/Gain HUD
We extend the previous live-view ViewModel with:
- FPS measurement using a
Stopwatch - HUD updates throttled to ~10 Hz
- Exposure and gain values displayed alongside FPS
Connect/Disconnectare omitted here—refer to your earlier WPF snapshot article.
|
1 2 3 4 5 6 7 8 9 10 11 12 13 14 15 16 17 18 19 20 21 22 23 24 25 26 27 28 29 30 31 32 33 34 35 36 37 38 39 40 41 42 43 44 45 46 47 48 49 50 51 52 53 54 55 56 57 58 59 60 61 62 63 64 65 66 67 68 69 70 71 72 73 74 75 76 77 78 79 80 81 82 83 84 85 86 87 88 89 90 91 92 93 94 95 96 97 98 99 100 101 102 103 104 105 106 107 108 109 110 111 112 113 114 115 116 117 118 119 120 121 122 123 124 125 126 127 128 129 130 131 132 133 134 135 136 137 138 139 140 141 142 143 144 145 146 147 148 149 150 151 152 153 154 155 156 157 158 159 160 161 162 163 164 165 166 167 168 169 170 171 172 173 174 175 |
using Basler.Pylon; using BaslerSamples; using Common; using System; using System.Diagnostics; using System.Threading; using System.Threading.Tasks; using System.Windows; using System.Windows.Media; using Application = System.Windows.Application; namespace BaslerGUISample.ViewModels { public class MainViewModel : BindableBase { BaslerCameraSample _cameraService = new BaslerCameraSample(); // Fields for HUD calculation private readonly Stopwatch _fpsSw = new(); private int _frameCount; private long _lastHudUpdateMs; private bool _isConnected; public bool IsConnected { get => _isConnected; set { SetProperty(ref _isConnected, value); } } private bool _isGrabbing; public bool IsGrabbing { get => _isGrabbing; set => SetProperty(ref _isGrabbing, value); } private ImageSource? _currentFrame; public ImageSource? CurrentFrame { get => _currentFrame; set => SetProperty(ref _currentFrame, value); } // HUD text public string FpsText { get => _fpsText; private set => SetProperty(ref _fpsText, value); } public string ExposureText { get => _expText; private set => SetProperty(ref _expText, value); } public string GainText { get => _gainText; private set => SetProperty(ref _gainText, value); } private string _fpsText = “FPS: –.-“; private string _expText = “Exposure: — μs”; private string _gainText = “Gain: — dB”; public DelegateCommand StartCommand { get; } public DelegateCommand StopCommand { get; } public MainViewModel() { StartCommand = new DelegateCommand(Start, () => IsConnected && !IsGrabbing); StopCommand = new DelegateCommand(Stop, () => IsConnected && IsGrabbing); } public void Start() { if (IsConnected == false) return; // Subscribe (remove once to avoid duplicates) _cameraService.RemoveImageGrabbedEventHandler(OnImageGrabbed); _cameraService.AddImageGrabbedEventHandler(OnImageGrabbed); _cameraService.StartLive(); IsGrabbing = _cameraService.IsGrabbing; // HUD init _fpsSw.Restart(); _lastHudUpdateMs = 0; Interlocked.Exchange(ref _frameCount, 0); } public void Stop() { if (_cameraService.IsConnected == false) return; _cameraService.StopGrabbing(); _cameraService.RemoveImageGrabbedEventHandler(OnImageGrabbed); IsGrabbing = _cameraService.IsGrabbing; } private int _updating; // overload protection /// <summary> /// Called when a frame is received. /// Updates the video frame every time, and updates HUD at ~10 Hz. /// </summary> private async void OnImageGrabbed(object? sender, ImageGrabbedEventArgs e) { IsGrabbing = _cameraService.IsGrabbing; // Overload protection: drop frames while processing UI update if (Interlocked.Exchange(ref _updating, 1) == 1) return; try { using IGrabResult result = e.GrabResult.Clone(); // Video update (switch to UI thread) await Application.Current.Dispatcher.InvokeAsync(() => { var frame = BaslerCameraSample.ConvertGrabResultToBitmap(result); CurrentFrame = frame; }); // Count frames Interlocked.Increment(ref _frameCount); // HUD update (~10 Hz) var nowMs = _fpsSw.ElapsedMilliseconds; if (nowMs – _lastHudUpdateMs >= 100) { int count = Interlocked.Exchange(ref _frameCount, 0); double fps = count * 1000.0 / Math.Max(1, nowMs – _lastHudUpdateMs); _lastHudUpdateMs = nowMs; // Read exposure/gain (catch differences between models) string expText = _expText, gainText = _gainText; try { double exp = _cameraService.GetExposureTime(); expText = double.IsNaN(exp) ? “Exposure: — μs” : $“Exposure: {exp:0} μs”; } catch { /* keep previous */ } try { // If Gain is not supported, use GainRaw instead double gain = _cameraService.GetGainRaw(); gainText = double.IsNaN(gain) ? “Gain: –“ : $“Gain: {gain:0.0}”; } catch { /* keep previous */ } Application.Current?.Dispatcher.Invoke(() => { FpsText = $“FPS: {fps:0.0}”; ExposureText = expText; GainText = gainText; }); } } catch (InvalidOperationException ex) { MessageBox.Show($“Failed to grab. Error: {ex.Message}”); } catch (TaskCanceledException) { // If the app closes during live view, this can occur. } finally { Interlocked.Exchange(ref _updating, 0); } } } } |
Example Output
You’ll see FPS, exposure, and gain values displayed in the upper-left corner of the live preview. Live view makes FPS variations surprisingly fun to watch—feel free to customize your HUD further (movable HUD, crosshair, etc.).
Common Pitfalls & Fixes
-
Text looks blurry/jitters → Keep HUD on a separate layer (screen-fixed). Enable
UseLayoutRounding,SnapsToDevicePixels, and ClearType settings. -
UI is sluggish → Update video quickly; throttle HUD updates to ~10 Hz. Do heavy work (saving/analysis) on background threads.
-
Event handler registered twice → Always do
-=then+=inStart(), and unsubscribe inStop()/Disconnect().
Summary
- Implemented a dual-layer UI: image layer + HUD layer
- HUD stays fixed in screen coordinates, making it stable during future zoom/pan
- Displayed FPS, exposure, and gain, with FPS refreshed at ~10 Hz
- Ready for extensions like ROI overlays and HUD-included capture with
RenderTargetBitmap
コメントを残す